Snow falling heavily on the sea, the broom and my Volvo. Glenelg, Highlands. March 2023.

FTP Transfer using SSH

Yesterday I learned how to migrate to a new web host in a very satisfyingly geeky way. If you are on Mac OS open up Terminal (enable the Homebrew theme) dim the lights, or block them out if possible, stick on the Matrix Soundtrack from 1998 and prepare to login to SSH! Its command line and slightly overwhelming.

SSH gives a user access to a remote machine so you can run commands on that server… as if you were in the room. Like scren sharing in the command line. When migrating loads of files from one remote place to another this is great as it saves us a step. Rather than transferring gigabytes of data from one remote server to our local machine to then forward on to another remote machine we just login and get the two remote machines to sort it out between themselves. Up here in the Scottish Highlands I’m on a community owned broadband network and I’m almost certain our local internet guru would have something to say about 100’s of gigabytes flying around so that was my reason for stumbling upon this magic code.
(more…)

Introduction

Part of my first iBlog from twenty years ago.

Hello. It has been a while. I’m sitting at my screen waiting for files to migrate to a new server. Snow is falling outside and its covered the garden and the fields immediately opposite, a few hungry sheep are staring in the front. I can’t do ‘work’ as everything is metaphorically up in the air. What a good opportunity, I thought, to reinstate my blog. My name is Callum and I’m an internet user like you.

I made my first webpage using Microsoft FrontPage in 1998 with help from our formidable music teacher Mr. Carr. He was the first real life computer geek I ever met and although I had an inkling that I might like meddling with the internet he was instrumental in actually showing me how to log-on and get with it. I was 12 years old and it was during our School‘s ‘three day event’ when classmates could opt for mountaineering, horse riding, extra rugby or an educative trip that I chose to sit in front of a computer screen. Mr. Carr gave us a basic introduction to FrontPage’s WYSIWYG interface and then in a very hands-off way, let us get to it. He quietly sat behind a bank of monitors and punched away at the keyboard, no doubt updating the school’s website, offering limited design advise from time-to-time and outlining the process of publishing to a server. At the end of 72 hours I had published my first webpage online. The webpage was #ca0000 red and had a visit counter, that’s all I remember.

It was that summer that our family upgraded from a Macintosh IIGS to an internet-ready windows desktop. It was shaped like a stumpy, beige rocket. I cried real tears in the computer shop as they also stocked the brand new iMac in its delicious semi-transparent flavours, the sales person advised my parents’ that Apple was obsolete, where is he now? Nevertheless I was obviously very lucky that my parents splashed out on a multimedia PC, built in speakers, CD-ROM and wonderful dial-up capability. Wonderfully annoying dial-up; I can still hear my mother screaming from down the stairs, finding time-and-time-again the line engaged as I’d logged-on to update Encarta, download 4MB film trailers or surf altavista.com. I would continue to update my website too, picking up a little CSS and HTML along the way for the next five years. With my second paycheque I would buy a (already a modern classic) Bondi Blue iMac. My introduction to blogging was in 2003 with the software iBlog, later WordPress and the wonderful Kubrick theme by the ever helpful Michael Heilemann. His own blog was an inspiration and seemed to lead me into an internet of nice folk, people who cared and shared (mainly code and star wars). I sat in my bedroom in Aberdeenshire behind a bank of monitors, still living with my parents, published a plugin for WordPress (Starred Review), wrote film reviews and posted hundreds of photographs of me and my pals doing silly things. Now I feel nostalgic. 

Back to today, migration complete. I’ve been using SSH to connect to my old host via FTP and despite occasional network outages today in the frozen Highlands of Scotland it has been a success. Back to work. I’ll just write a quick introduction here. The snowing has ceased here, its a winter wonderland outside. Across on Skye I can almost distinguish the mountains behind more incoming white.

With this new iteration of my weblog I intend to write in a personal way about where my real life intersects with things I do here at the computer. The title of my previous blog was Meta Comment, expect more of the same. Here I’ll occasionally dump some code, link to something I think is clever, share some photography (which I create but ironically never print) and talk about myself. Welcome to my website.

Vintage Fujinon

[this post I wrote on Tumblr was retrieved via WayBackMachine, originally published in Feb 2015]

You might have seen my previous post which talked about Fuji’s M42 lenses on Fuji X series, I’ll freely admit I’ve become a bit obsessed with the subject. Here’s another hundred words on Fujinon Lenses:

image
A wonderful collection of lenses and cameras circa 1972 from the ST-901 brochure.

I’ve taken a few good shots on the Fujinon•T EBC 135mm ƒ3.5 I picked up last week. A wonderful lens Fuji produced in the 70’s. Terrific build quality, stunning glass.

I’ve always been partial to Fuji lenses, grew up using my dad’s ST-801 when I was younger. I didn’t even know that interchangeable lenses existed back then. That camera had a 55mm ƒ1.8… that’s all I knew the quality was amazing. The first 35mm film camera I ever used AND it still works, I’ve recently picked up two lenses from the series. Can’t wait to get them on the ‘real’ full frame camera, which is out on loan. Anyway- the X-E1 will do for today.

Fujinon M42 + Fuji X

[this post I wrote on Tumblr was retrieved via WayBackMachine, originally published in Feb 2015]

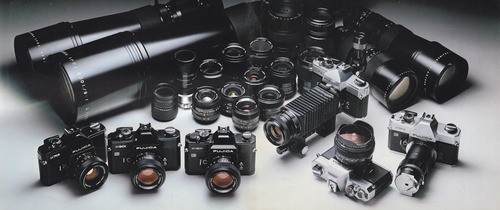
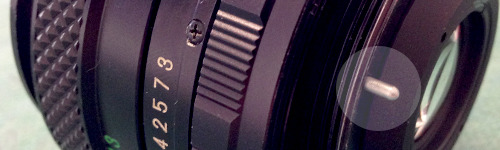
After buying this beautiful lens; Fujinon•SW EBC 28mm ƒ3.5 – an oldie but goodie – I thought I’d write this post to distill my findings from various discussion groups and blogs regarding the use of older lenses (M42 screw fitting) on modern Fuji X-E1/E2’s.

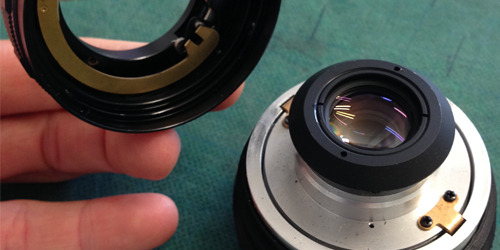
Adapters– There’s a lot of talk on the internet about adapters. All boiling down to build quality and the debate over flange non-flange adapters.

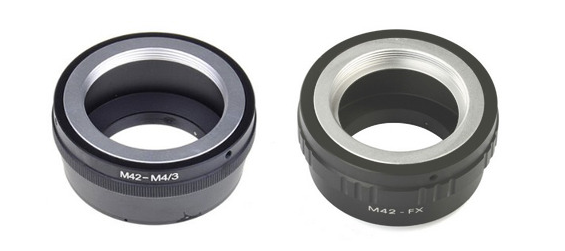
An adapter with a ‘flange’ (above right) has a circular step on the inside of the adapter, this will allow you to use “auto-only” M42 lenses on your camera by causing a pin (see below) sometimes called the “aperture pin” to be pushed inside the lens. If your lens was built with an automatic setting and no mode switch to toggle between auto/manual aperture the discussions online point towards buying an adapter with a flange. Here’s an adapter with a flange on Amazon.

The adapter shown (above left) has no flange. It will not depress the ‘aperture pin’ and wouldn’t be suitable for an ‘auto-only’ M42 lens… according to most discussions out there. If your camera has a manual toggle this may be the adapter for you.

For build quality look for adapters made from ‘metal’, copper or brass internals. Plastic will cause you bother. In the end I purchased this non-flanged adapter from Amazon.co.uk

Aperture Pin– It’s not that simple, if you intend to use a few different lenses with the same adapter (over time) you may find that the rear of certain lenses won’t sit well with the flange. Furthermore holding the aperture pin in with force surely isn’t best practice. I tested my lens out on an adapter with a flange and found the aperture would barely move, it didn’t feel right. I then removed the lens and found if I applied a little strength pushing the pin in (leaving 2mm protruding) the aperture freely moved and I don’t think I’m doing damage to the lens. Now a way of ‘fixing’ the pin in that state. Without glue!

Turns out there is a simple trick to disable the pin. Outlined here with a discussion post started by Arkku on Flickr. I gave it a go.

Surgery:

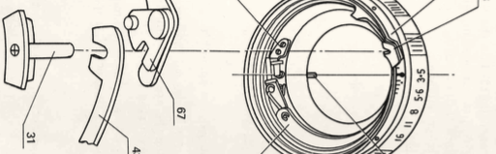
Step One– removal of the rear of the lens. Where the lens screws into camera. This slides off with the removal of three screws. Careful as there are delicate fittings within. Comes off best at an angle.

… below an image from the Fujinon Repair Manual

Step Two– find the pin on the inside of the lens. We’re going to ‘cushion’ the pin so it remains in the lens. This could later be removed if I wanted to use the lens on a Fujica ST camera, which is what the pin is useful in.

Step Three– take an old biro, and trim 2mm, this will be slipped on the pin from the ins. This forum post [No. 13] discusses the procedure in more detail. This webpage shows the operation in fantastic detail (different lens).

Step Four– insert plastic ‘cushion’ (2mm biro), I cut out a section to help this slip in without dismantling the whole mechanism. The point is not entirely to force the pin inside the lens but to allow the aperture to change without damaging anything, free movement is the key.

Once this is done you can re-build the lens by carefully linking up the aperture pin inside the brass latch (with groove) along with a black metal clip (with groove). Once aligned try and close, screw back together and that’s you.

Image below taken from the repair manual which you can download here: on Dropbox.

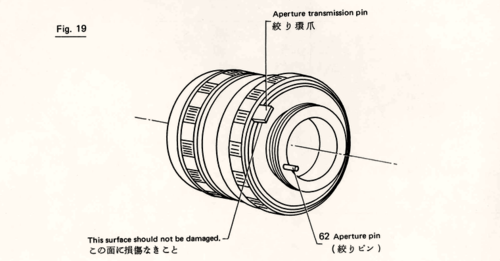
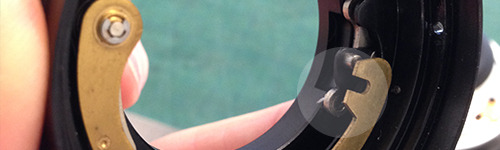
Fujinon Aperture Transmission Pin– There is a further issue with Fujinon lenses. Shown in the image below certain Fuji lenses intended for use on the Fujica ST-xx cameras have a little metal protrusion- a pin or tab known as the ‘transmission pin’.

Fujica cameras have a pin round the lens mount which rotates against a light spring pressure. This, coupled with a tab on the camera body, locks at a precise distance and sets the maximum aperture of the lens being installed. Once the lens installs the metering knows the max aperture, which enables the full aperture framing and focusing. #

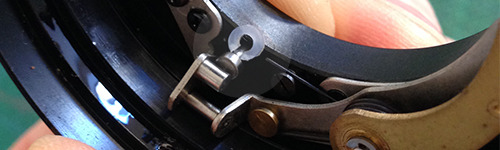
By lucky coincidence the adapter Amazon sent me happens to be built in such a way that when tightened up the ‘pin’ just misses the metal connector.

Above is an image showing the clearance of .5mm on the between the adapter’s metal lip and ‘pin’. Below you can see the M42 Lens tightened on the adapter. There is a little space- caused by the metal lip on the adapter (not caused by the index tab).

A last shot showing everything in its right place. Looking forward to picking up a Speed Booster someday.

My Homepage 2011